![]() Getting Started With Spectacle Lens Ordering
Getting Started With Spectacle Lens Ordering
To order prescription spectacle lenses on VisionWeb:
- Mouse over the “Order Now” button in the top navigation bar, and click the “Rx Lenses” button in the drop-down menu.

![]()
![]() Select The Type of Order You Would Like to Place
Select The Type of Order You Would Like to Place
- To place a New Order, click the “New Order” button at the top of the screen.
- To place a Reuse Order, click the “Reuse” button at the top of the screen. Refer to the the User Guide section on Reuse orders.
- To place a Redo Order, click the "Redo" button at the top of the screen. Refer to the User Guide section on Redo Orders. Note: This feature will only be available if one of your labs supports the redo option.
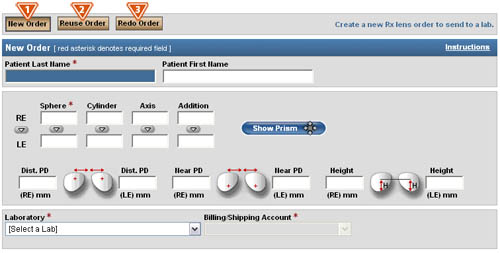
Once you have selected to place a new order, fill in the form as it appears on your screen. The VisionWeb system displays only those fields appropriate to the prescription and specific options you choose. All required fields are marked with a red asterisk.
QuickTip: Use the Tab key to advance through fields throughout the ordering engine to save time.
![]()
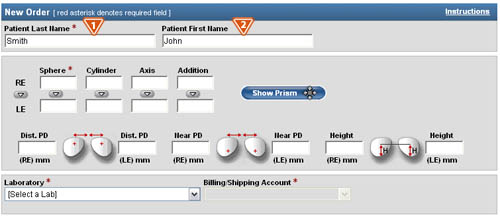
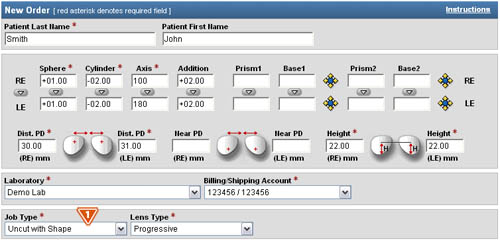
- Patient Last Name—Enter the patient’s last name.
- Patient First Name—Enter the patient’s first name.
![]()
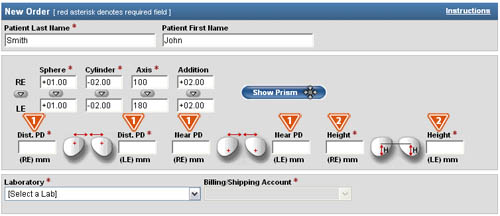
![]() Patient Prescription—Sphere, Cylinder, Axis, and Addition
Patient Prescription—Sphere, Cylinder, Axis, and Addition
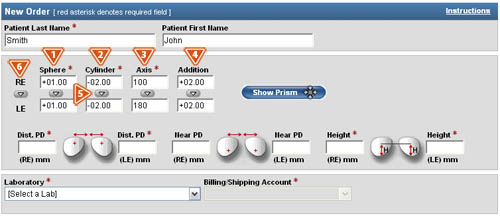
- Sphere—Enter the Sphere in quarter or 0.12 diopters, as specified by your lab. The default measurement for this field is quarter diopters, unless your lab supports 0.12 diopter measurements. The spherical power will default to a plus (+) unless you indicate that it is a minus (-) by entering "-" in the field.
- Cylinder—Enter the Cylinder in quarter or 0.12 diopters, as specified by your lab. The default measurement for this field is in quarter diopters, unless your lab supports 0.12 diopter measurements. The cylinder power defaults to a minus (-) unless you indicate that it is a plus (+) by entering a "+" in the field.
- Axis—Enter the value in a range of 1 to 180 degrees.
- Addition—Enter the Addition in quarter diopters.
- Copy Field—The small arrows allow you to copy values from the Right Eye (RE) fields to the corresponding Left Eye (LE) fields.
- Copy Eye—The arrow between the RE and LE, allows you to copy the entire Rx.
- If you are ordering a single lens, complete the prescription information only for the required eye, and leave the fields associated with the other eye blank.
Note: You cannot order a single vision lens and a multi-focal lens on the same order.
![]()
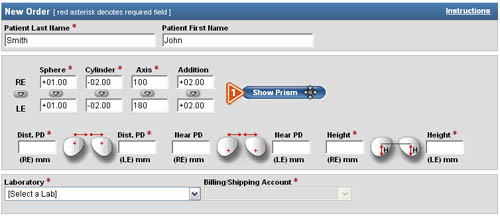
![]() Patient Prescription—PD and Height
Patient Prescription—PD and Height
- Distance PD and Near PD—Enter the patient’s measurements in half-millimeter increments in the appropriate fields. PDs must be entered in monocular form.
- Height—Enter the measurement in half-millimeter increments. For a single vision Rx, the Height field is automatically populated with the optical center. By default, the optical center value for a single vision lens is pre-populated after the “B” measurement is entered and is equal to ½ the “B” measurement. It may be edited if necessary. For a progressive Rx, the Height is the fitting height. For other multi-focal Rx, the Height is the segment height.
Note: If you need to make changes to the Rx simply edit the fields that should be changed.
![]()
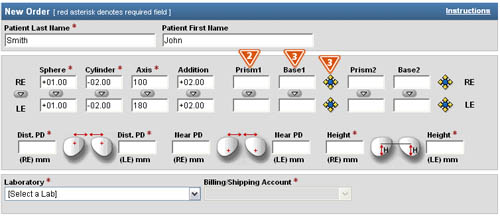
- Show Prism—If required, click the “Show Prism” button and fields will appear to enter prism values that correspond to the prescription.
- Prism—Enter the dioptric value of the prism in the “Prism” field.
- Base—Indicate the direction in the “Base” field. “Base” values, or prism direction, can be specified in the following ways:
- By typing the words “Up”, “Down”, “In”, or “Out” in the “Base” fields.
- By typing the first letter of the direction (“U”, “D”, “I”, or “O”) in the “Base” fields.
- By clicking the corresponding arrow located on the diamond-shaped figure next to each “Base” field, or
- By entering degrees ranging from 1 to 360.
![]()
- Laboratory—Select a supplier from the list of suppliers you have set up in the My Account section.
- Billing/Shipping Account—Upon selecting a supplier, you will be able to select from your available billing/shipping accounts for the supplier. If you only have one billing/shipping account, the field will be pre-populate.
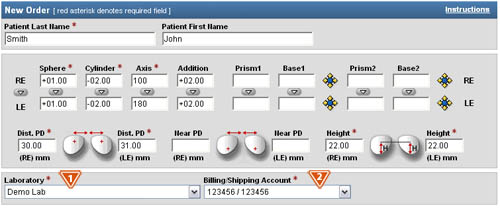
Once you have selected your supplier, your screen will refresh as the ordering engine accesses VisionWeb’s customized “smart” catalogs. These “smart” catalogs only show you products available from your selected supplier and help ensure error-free lens ordering.
![]()
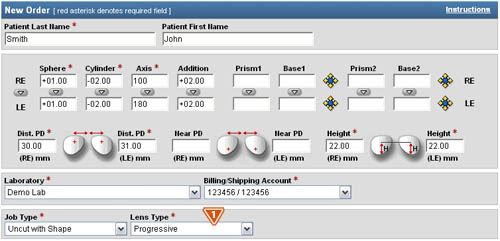
- Job Type—Select a job type based on how you wish the lens to be finished. Available job types are determined by the supplier. (Choices may include Uncut with Shape, Uncut w/no Shape, Uncut w/ ED Only, Frame to Come, Remote Edged, and Lenses Only, but choices and wording may differ by supplier).
![]()
- Lens Type—Select a lens type for the job. Lens type choices are determined by the prescription. (Examples include single vision, bifocal, trifocal, and progressive.) The screen will refresh to display the available lens design, material, and treatment options for the chosen lens design.
![]()
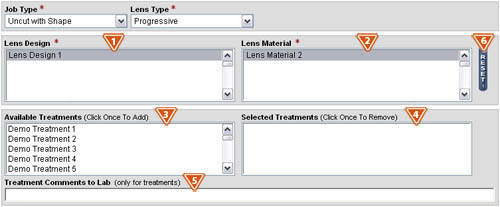
![]() Lens Design, Material, and Treatment Options Selection
Lens Design, Material, and Treatment Options Selection
-
QuickTip: There are three ways to search for materials, treatments, and lens designs. You can start by choosing the lens design, material, or treatments. Depending on your selection, only valid results will appear for the other choices.
- Lens Design—Select a lens design by highlighting the item.
- Lens Material—Select a lens material by highlighting the item.
- Available Treatments—Click the treatment option(s) that you would like and they will be moved to the Selected Treatment field.
- Selected Treatments—To remove a treatment, simply click the treatment and it will be moved back into the Available Treatments field.
- Treatment Comments To Lab—If applicable, enter tint color, mirror color, density, or other comments. (Special instructions to the lab and product ordering information should not be entered in this field).
- Reset—To remove a treatment option, or reset the Lens Type, Lens Design, or Lens Material fields; click the "Reset" button.
![]()
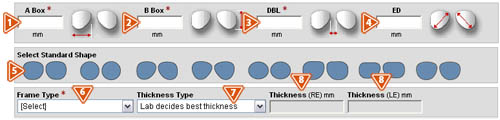
![]() Frame Measurements and Lens Thickness Information
Frame Measurements and Lens Thickness Information
Frame measurements and thickness information can be entered in one of two ways:
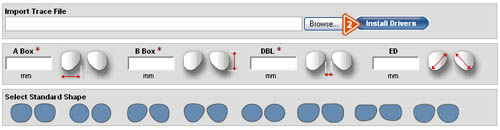
Option 1—Enter the A, B, and Dbl, and select a standard frame shape
- A box—Enter the “A” measurement to the nearest 1/10th millimeter, if required. (If the field is not visible, your lab does not require the information for the selected “Job Type”).
- B box—Enter the “B” measurement to the nearest 1/10th millimeter, if required. (If the field is not visible, your lab does not require the information for the selected “Job Type”).
- Dbl—Enter the “Dbl” (distance between lenses) measurement to the nearest 1/10th millimeter, if required. (If the field is not visible, your lab does not require the information for the selected “Job Type”).
- Ed—Enter the “Ed” (effective diameter) measurement to the nearest 1/10th millimeter, if required. (If the field is not visible, your lab does not require the information for the selected “Job Type”.) If you do not enter an “Ed” measurement, and you have selected a “Frame Shape”, the “Ed” measurement will automatically be calculated.
- Select Standard Shape—Click the shape that most closely resembles the frame being used for the job. (If the fields are not visible, the information is not required).
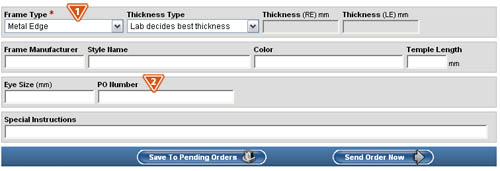
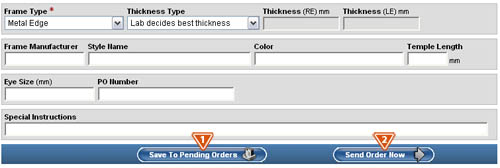
- Frame Type—Select a frame type. (This information is required for some Job Types, and it is used by the laboratory lens processing system as part of the lens thickness calculations).
- Thickness Type—Select the lens thickness. The “Edge Thickness”, “Center Thickness”, and “Thickness at Drilling Point” options all give you the ability to specify particular lens thickness requirements. If you choose the “Lab Decides Best Thickness” option, you will not be required to enter the exact lens thickness information.
- RE Thickness and LE Thickness—Enter the “RE Thickness” and “LE Thickness” to the nearest 1/10th millimeter, if applicable.
QuickTip: For single vision lenses, the “Height” field will be populated with 1/2 the “B” measurement after the “B” measurement is entered. If you wish to change the “Height”, you can adjust it at this time.
QuickTip: If “Ed” is required, and you would rather choose a shape and not enter an “Ed”, try selecting a different “Job Type”. Your “Job Type” selection will determine whether or not you must enter the “Ed”.
- Import Trace File—After you have selected the lens type, design, material, and treatments for the job, you can select to import a trace file and search your computer for the applicable file. Note: This feature is available based on the Job Type and supplier.

- Install Drivers—The tracer driver must be installed prior to attaching a trace file to a job, click here to install a trace driver.
- Browse—Click the “Browse” button to search for the trace file. This will open the “Choose File” screen, which allows you to search your computer for the applicable file, or enter the directory path and the name of the trace file that you want and clcik the “Browse” button.
- Select the file you wish to upload, and click the “Open” button.
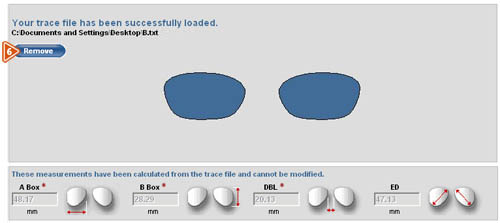
- You will now see the main ordering screen with the exact frame shape, measurements, and frame type that was imported.
- Delete Imported Trace File—If you wish to delete the imported trace file, click the “Remove” button, and follow the previous steps to select another trace file to upload.
QuickTip: Clicking the “Remove” button will not delete the trace file from your computer’s hard drive.
![]()
![]() Installing A Tracer Driver
Installing A Tracer Driver
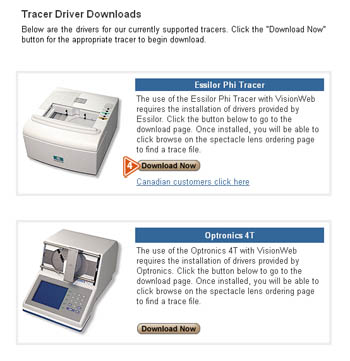
Note: This feature is available based on the Job Type and supplier.
- The tracer driver must be installed prior to attaching a trace file to a VisionWeb job.
- To do this, click the “Install Drivers” button in the Import Tracer File section.
- Scroll through the list of compatible tracers, and select the tracer that you wish to use.
- Click the “Download Now” button, and follow the instructions for the applicable tracer. In order to import a trace file, you must be connected to a compatible tracer.
![]()
![]() Office PO Number and Special Instructions
Office PO Number and Special Instructions
- Office PO Number—Record any numeric tracking numbers for the order, such as a purchase order number, invoice number, patient identification number, or tray number.
- Special Instructions—Enter any special instructions relative to this job. Note: This field is not meant to be used for ordering products not found in the product catalog.
QuickTip: Use care when entering special instructions. Entering a special instruction, such as “Rush”, can actually slow down a job since it must be manually reviewed before the order can be processed.
![]()
![]() Completing the Order
Completing the Order
Once you have provided all of the necessary information for the order, you can:
- Save to Pending Orders—Click the “Save to Pending Orders” button to hold the order until you are ready to submit it at another time. (Refer to the User Guide section on Pending Orders for more details).
- Send Order Now—Click the “Send Order Now” button to send the order to the processing laboratory immediately.
![]()
![]() Order Confirmation
Order Confirmation
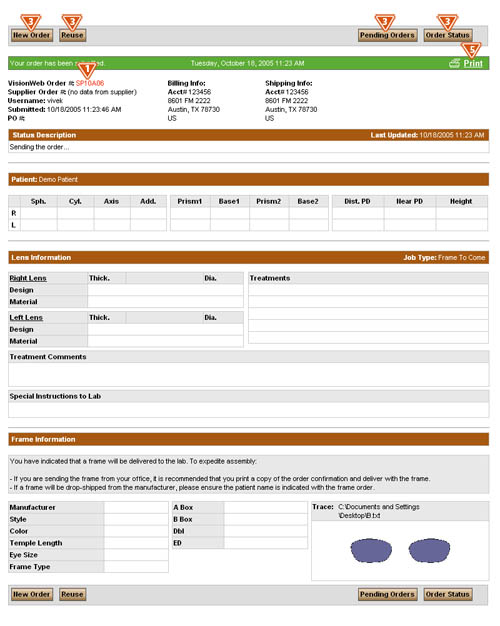
Once you have clicked the “Send Order Now” button, you will receive your order confirmation that contains the following information:
- The Order Number will appear at the top of the page.
- If you chose a frame shape or uploaded a trace file, you will see the shape of the frame on this page. Note the frame shape will not appear for all Job Types.
- On the Order Confirmation page you will have the option to:
- Select to place a new order by clicking the "New Order" button.
- Select to reuse the order as the basis of a new order by clicking the "Reuse button.
- Select to view the status of your orders by clicking the "Order Status" button.
- Select to view your pending orders, by clicking the "Pending Orders" button.
- You can also use the navigation at the top of the page to navigate to any part of the site.
- You can print copies of the order summary page by clicking the printer icon located next to the “Close This Window” button at the top of the order summary page. You may want to print two copies of this page; one to act as a packing slip if you are sending the frame to the lab, and one to keep in the patient’s tray or file.