![]() Getting Started
Getting Started
To manage your VisionWeb account:
- Mouse over the “My Account” button in the top navigation bar, and then click the button in the drop-down menu that corresponds to the page you wish to view.

![]()
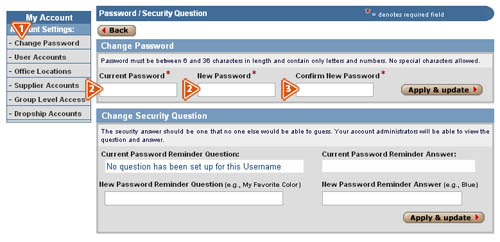
- On the My Account page, click the “Change Password” button in the left navigation bar
- Enter your current and new passwords.
- Once you have entered this information, click the “Apply & update” button.
![]()
![]() Managing Your User Accounts
Managing Your User Accounts
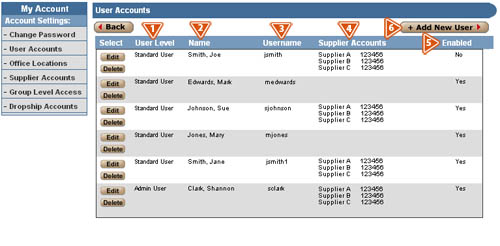
On the My Account page, click the “User Accounts” button in the left navigation bar to view, create, or make changes to a user account. There are two types of users that can be created: Standard and Admin. Admin users have the ability to restrict and grant access to supplier accounts. Standard users must be given access to each supplier to place orders. You can have up to 10 users on your VisionWeb account.
The user who originally set up the VisionWeb account is an Admin user by default. Admin users can add, edit, or delete additional users. On the User Accounts page, details of each user will be displayed. They are described below:
- User Level—refers to the level of access designated to each user, either Admin or Standard.
- Name—is the user’s name.
- Username—is the log in name of the user.
- Supplier Accounts—refers to the billing or shipping account information attached to a specific user—the accounts the user has been given access to by the Admin user.
- Enabled—indicates whether or not the user is active (user must be enabled in order to log in).
- To add a user, click the “+Add User” button to begin the new user set up. Note that you will want to set up your suppliers before adding additional users.
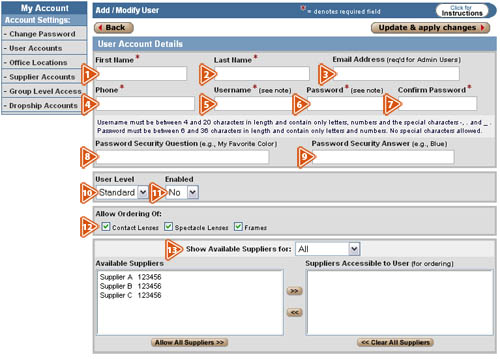
The “Add/Modify User” screen will prompt for the following information (fields marked with a red asterisk are required):
- First Name—Enter the user’s first name.
- Last Name—Enter the user’s last name.
- E-Mail Address—Enter the e-mail address for the user.
- Phone number—Enter the phone number for the user.
- Username—Enter the username for the user (must be between 4 and 20 characters in length and contain only letters, numbers, and the special characters: , . and _).
- Password—Enter the password for the user (must be between 6 and 36 characters and contain only letters or numbers; special characters are not allowed).
- Confirm Password—Re-enter the password.
- Password Security Question—Enter the password security question for the user.
- Password Security Answer—Enter the password security answer for the user (this will correspond with the Password Security Question).
- User Level—Choose a level for the user, either Admin or Standard.
- Enabled Status—Set the user’s enabled status
QuickTip: To log in, “Enabled Status” must be set to yes.
- Allow Ordering Of—Choose the types of products this user will be able to order. (To add suppliers to your VisionWeb account, refer to the User Guide section on “Supplier Accounts).
- Choose Suppliers—Allow access to your validated suppliers for Standard users.
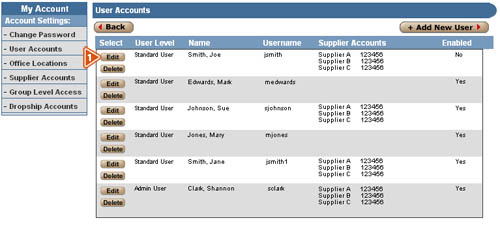
- To modify a user, click the “Edit” button associated with the user you wish to modify.
- The “Add/Modify User” screen will be populated with the selected user’s information, as described above. Make the necessary changes and click the “Update & Apply Changes” button to save.
![]()
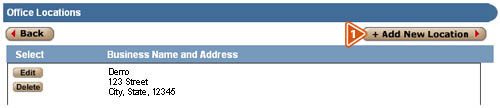
- On the My Account page, click the “Office Locations” button to add or edit office locations. Admin users can add and edit office locations.
To add an office location from the Office Locations page:
- Click the “+Add New Location” button at the top of the screen
.
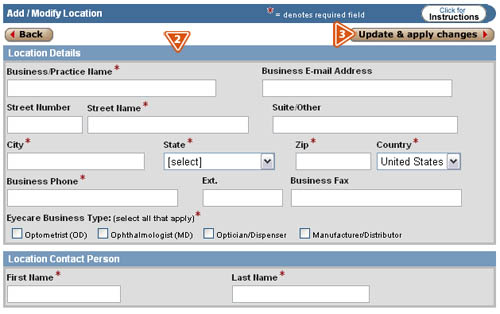
- Add the new location information in the specified fields. Note that any field with a red asterisk is a required field.
- When you have completed the form, click the “Update & apply changes” button.
To edit an office location from the Office Locations page:
- Select the office location that you wish to edit, and click the corresponding “Edit” button.
- Edit the location information in the specified fields. Note that fields marked with a red asterisk are required.
- When you have completed this, click the “Update & apply changes” button.
To delete an office location from the Office Locations page:
- Select the office location that you wish to delete, and click the corresponding “Delete” button.
- A pop-up dialogue box will appear that will ask you if you are sure that you want to delete this location.
- Click “OK” and the location will be deleted; click “No” to return to the Office Locations page.
![]()
![]() Supplier Accounts
Supplier Accounts
In the Supplier Accounts section, Admin users can add and delete suppliers. To view the current list, click the “List of Suppliers” button in the top navigation bar of the VisionWeb home page at: www.visionweb.com. VisionWeb works with your existing supplier accounts. To add a supplier that you do not currently have an account with, you will need to first contact that supplier for an account number. Phone numbers for VisionWeb suppliers can be viewed from the Add New Supplier Page.
Once you have an account number from the supplier, you can add it to your list of suppliers:
- Click the “My Account” button in the top navigation bar.
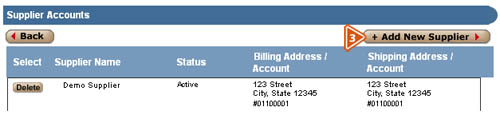
- Click the “Supplier Accounts” button in the left navigation bar.
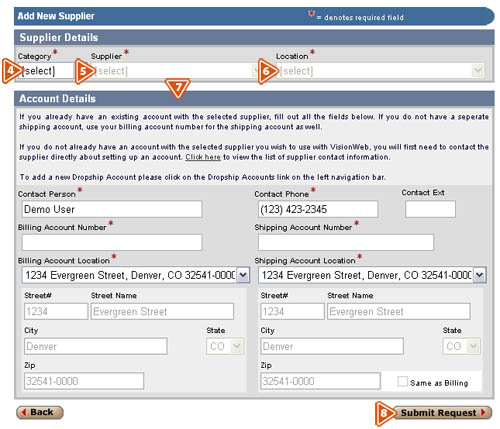
- Click the “+Add New Supplier” button at the top of the screen.
- On the Add New Supplier page, in the Supplier Details section, select the category of your supplier (contacts, frames, or lenses) from the drop-down menu.
- Next, select the supplier you wish to add from the “Supplier” drop-down menu (note that suppliers highlighted in grey and marked “Coming Soon” are not yet available).
- Choose your supplier’s location from the “Location” drop-down menu.
- Complete the form in the “Account Details” section. (You must enter valid account numbers in the “Billing Account Number” and “Shipping Account Number” fields. Entries such as “same” are not valid.) Fields marked with a red asterisk are required.
- Once you have completed the form, click the “Submit Request” button to submit your request for account validation.
All suppliers normally validate accounts within 24 hours or less. If you have questions about your account validation, please call VisionWeb Customer Service at 1-800-874-6601.
To delete a supplier account from VisionWeb:
- Click the “My Account” button in the top navigation bar.
- Click the “Supplier Accounts” button in the left navigation bar.
- Select the supplier account you wish to delete, and click the corresponding “Delete” button.
- A pop-up box will appear to remind you that all orders under this account in pending orders and archives will be deleted if you delete the account.
- Click “OK” and the supplier account will be deleted; click “Cancel” to return to the Supplier Accounts screen.
Note: that deleting a supplier account will only remove it from your VisionWeb account. If you wish to cancel your account with a supplier, you must contact the supplier directly.
![]()
![]() Group-Level Access
Group-Level Access
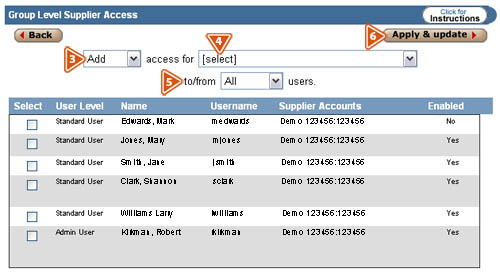
VisionWeb allows you to change access settings for all users at one time using “Group Level Access.” This time-saving tool can help when setting up new supplier accounts that your staff uses regularly. To add/remove access to multiple users for a specific supplier account:
- Click the “My Account” button in the top navigation bar.
- Click the “Group Level Access” button in the left navigation bar.
- Select the appropriate action from the drop-down menu to “Add” or “Remove” access.
- Choose the supplier account from the drop-down menu.
- Use the drop-down list to change access for a group; otherwise, select the check boxes of all the users that you want to include6. Click the “Apply & update” button at the top right of the screen.
![]()
![]() Dropship Accounts
Dropship Accounts
VisionWeb allows you to dropship frames from a frame supplier directly to a spectacle lens lab. The ability to add a Dropship account is determined by the supplier. If you are unable to add a Dropship account, you can contact Customer Service at 1-800-874-6601 for assistance. In order to use this feature, you must first set up your Dropship accounts with the supplier. To add a new Dropship account on VisionWeb:
- Click the “My Account” button in the top navigation bar.
- Click the “Dropship Accounts” button in the left navigation bar.
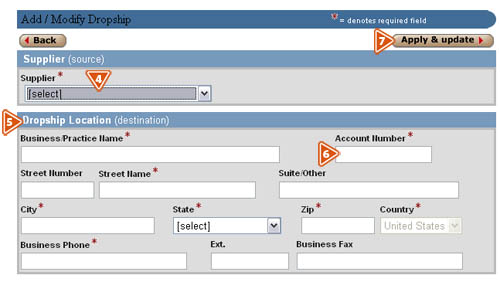
- Click the “+Add New Dropship” button; this will bring you to the “Add/Modify Dropship” page.

- Select the frame supplier or source that you want to dropship from in the “Supplier” field.
- Enter the required information for the lab or destination location for the Dropship to be sent to in the “Dropship Location” fields.
- You must enter your Dropship account number with the supplier in the “Account Number” field; if you have questions about your Dropship account information, please contact your supplier.
- When you have finished entering all of the required information, click the “Apply & update” button at the top right of the page.
Suppliers typically validate accounts within 24 hours or less. When a Dropship account is validated, it will appear as an active account when you select frame shipping destination in the frame ordering engine. If you have questions about Dropships or adding Dropship accounts, please contact VisionWeb Customer Service at 1-800-874-6601.