| |
| |
Redo Orders are previous orders that you would like to resend for redo at a lab. These orders are incorrect for some reason and need to be re-done at the lab. Redo orders are not new orders and they require an explanation for redo. Please note that the Redo Order functionality is available based on the supplier.
![]() Getting Started
Getting Started
To place a spectacle lens redo order on VisionWeb:
- Mouse over the “Order Now” button in the top navigation bar, and click the “Rx Lenses” button in the drop-down menu
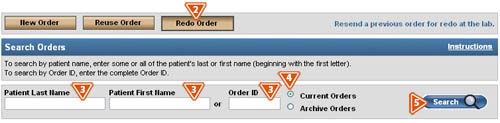
- Click the “Redo” button from the options at the top of the screen
- To find the previous order that you would like to redo, enter search criteria into the “Patient Last Name”, “Patient First Name”, or “Order ID” fields. (Note: the more search criteria that you enter, the more narrow the search results.)
- Select whether the order is a current order or an archived order.
- Once you have entered all of the necessary search criteria, click the “Search” button.
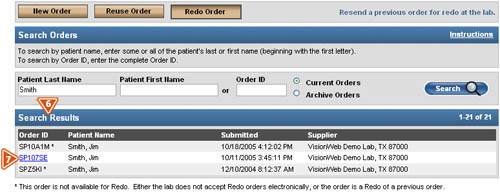
- The results of your search will then be displayed in the Search Results section. If no search results are found, you will be prompted to change your search criteria in order to find results.
- Select the order that you would like to resend to the lab for redo by clicking on the corresponding “Order ID.”
- If the order selected is incorrect, you may click the “View Results” button to return to the Search Results section.
Note: Packages and safety orders are not currently supported for Redo/Reuse. If the selected order is a safety or package order, an error message will appear.
Note: If you can not click on the corresponding “Order ID”, then the lab that the original order was sent to does not accept Redo orders. Please contact the lab to find out when this feature will become available.
Quick Tip: To search for more broad order results, simply reduce your search criteria. For example, if you enter “m” into the Patient Last Name search field, you will receive results on orders for patients with the last name that begins with the letter “m.” Try this with all of the search fields to find broad results more quickly.
![]()
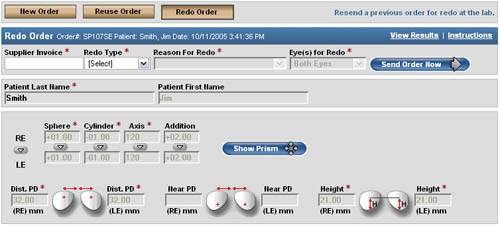
- Supplier Invoice – Enter in the supplier invoice number from the job to be redone in the “Supplier Invoice” field.
- Redo Type – When placing an order for redo, you will be able to select a reason for this redo in the “Redo Type” field. These reasons could include a lab error, a doctor error, a warranty, and a patient non-adapt.
- Reasons for Redo – Depending on the “Redo Type” that you selected, you will need to select a corresponding reason in the “Reason for Redo” field.
- If you selected “Lab” or “Warranty” as “Redo Type”, you will NOT be able to make changes to the Rx and will need to submit the order to the lab, as is, by clicking the “Send Order Now” button.
- If you selected “Doctor” or “Non-Adapt” as “Redo Type”, you can edit the Rx before resending the order to be re-done.
- Select Which Eye(s) To Redo – Select which eye(s) to redo by clicking the radio button next to each eye choice. You can select to redo “Both Eyes”, “Left Eye” only, or “Right Eye” only.
![]()
![]() Editing Patient Rx Information for Doctor or Non-Adapt Reason for Redo
Editing Patient Rx Information for Doctor or Non-Adapt Reason for Redo
- Patient Last Name – On all Redo orders, the patient last name cannot be edited.
- Patient First Name – On all Redo orders, the patient first name cannot be edited.
- Order ID – On all redo orders, the previous Order Confirmation page will be accessible by clicking on the Order ID number to the right of the “Patient First Name” field.
- Based on which eye(s) you selected for redo, your options will be limited when you edit the patient Rx.
- Sphere – Enter the Sphere in quarter or 0.12 diopters, as specified by your lab. The default measurement for this field is quarter diopters, unless your lab supports 0.12 diopter measurements. The spherical power will default to a plus (+) unless you indicate that it is a minus (-) by entering "-" in the field.
- Cylinder – Enter the Cylinder in quarter or 0.12 diopters, as specified by your lab. The default measurement for this field is in quarter diopters, unless your lab supports 0.12 diopter measurements. The cylinder power defaults to a minus (-) unless you indicate that it is a plus (+) by entering a "+" in the field.
- Axis – Enter the value in a range of 1 to 180 degrees (0 and 180 degrees are equivalent Axis values).
- Addition – Enter the Addition in quarter diopters.
- Copy Fields – The small arrows allow you to copy values from the Right Eye (RE) fields to the Left Eye (LE) fields.
- Distance PD and Near PD – Enter the patient’s measurements in half-millimeter increments in the appropriate fields. PDs must be entered in monocular form.
- Height – Enter the measurement in half-millimeter increments. For a single vision Rx, the Height field is automatically populated with the optical center (Note: By default, the optical center value for a single vision lens is pre-populated after the “B” measurement is entered and is equal to ½ the “B” measurement. It may be edited if necessary. For a progressive Rx, the Height is the fitting height. For other multi-focal Rx, the Height is the segment height).
- Prism – If the Rx requires prism values, and you need further instruction, please refer to the User Guide section on Spectacle Lens Ordering.
Since a Redo Order is simply an order to be resent to the lab with which the order was originally placed, there is no need, nor are you able to edit the Laboratory information, Job Type, Lens Type, Lens Design, Lens Material or Treatment Options.
Frame Measurements are editable if the Redo Type was “Doctor” and the Reason for Redo was “Frame Measurement.” For more detailed information on entering frame measurements and lens thickness information or importing a trace file, please refer to the User Guide section on Spectacle Lens Ordering.
![]()
![]() Completing the Redo Order
Completing the Redo Order
After all changes have been made to the redo order, check over the entire order and click the “Send Order Now” button to submit the order. (Note: Redo orders may not be saved to Pending Orders.)
At this point in the ordering process, you will be alerted if any errors have occurred in your order (errors will appear highlighted in yellow). You will be directed on the location of these errors and will be able to make changes.
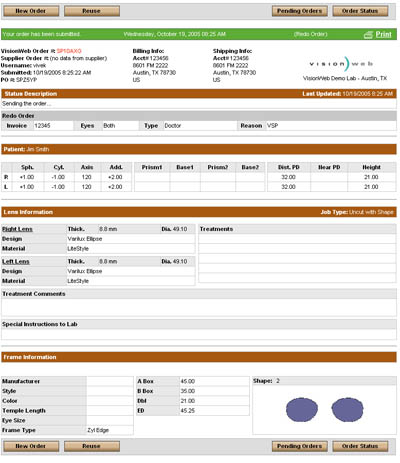
- Redo Order Confirmation Page - After you submit the redo order, you will be redirected to the Redo Order Confirmation page. On this page you will be able to review the redo order that was submitted. To print the Order Confirmation page, click the “Print” link.
- After reviewing the Redo Order, you can select from the following options:
- New Order – On the Redo Order Confirmation page, click the “New Order” button to go to place a new Rx lens order.
- Reuse – click the “Reuse” button to reuse the same order.
- Order Status – click the “Order Status” button to go to the Order Status page.
- Pending Orders – click the “Pending Orders” button to view the Pending Orders page.