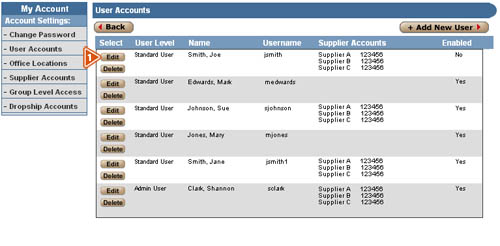
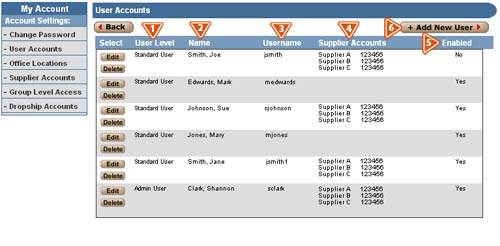
The user who originally set up the VisionWeb account is an Admin user by default. Admin users can add, edit, or delete additional users. On the User Accounts page, details of each user will be displayed. They are described below:
- User Level—refers to the level of access designated to each user, either Admin or Standard.
- Name—is the user’s name.
- Username—is the log in name of the user.
- Supplier Accounts—refers to the billing or shipping account information attached to a specific user—the accounts the user has been given access to by the Admin user.
- Enabled—indicates whether or not the user is active (user must be enabled in order to log in).
- To add a user, click the “+Add User” button to begin the new user set up. Note that you will want to set up your suppliers before adding additional users.
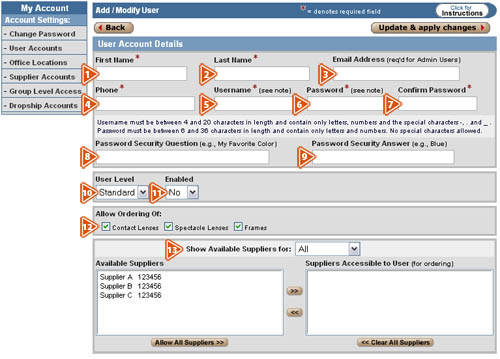
The “Add/Modify User” screen will prompt for the following information (fields marked with a red asterisk are required):
- First Name—Enter the user’s first name.
- Last Name—Enter the user’s last name.
- E-Mail Address—Enter the e-mail address for the user.
- Phone number—Enter the phone number for the user.
- Username—Enter the username for the user (must be between 4 and 20 characters in length and contain only letters, numbers, and the special characters: , . and _).
- Password—Enter the password for the user (must be between 6 and 36 characters and contain only letters or numbers; special characters are not allowed).
- Confirm Password—Re-enter the password.
- Password Security Question—Enter the password security question for the user.
- Password Security Answer—Enter the password security answer for the user (this will correspond with the Password Security Question).
- User Level—Choose a level for the user, either Admin or Standard.
- Enabled Status—Set the user’s enabled status
QuickTip: To log in, “Enabled Status” must be set to yes.
- Allow Ordering Of—Choose the types of products this user will be able to order. (To add suppliers to your VisionWeb account, refer to the User Guide section on “Supplier Accounts).
- Choose Suppliers—Allow access to your validated suppliers for Standard users.
- To modify a user, click the “Edit” button associated with the user you wish to modify.
- The “Add/Modify User” screen will be populated with the selected user’s information, as described above. Make the necessary changes and click the “Update & Apply Changes” button to save.