Frame measurements and thickness information can be entered in one of two ways:
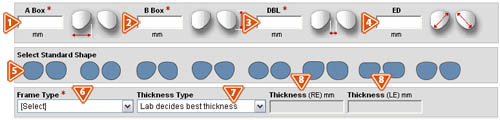
Option 1—Enter the A, B, and Dbl, and select a standard frame shape
- A box—Enter the “A” measurement to the nearest 1/10th millimeter, if required. (If the field is not visible, your lab does not require the information for the selected “Job Type”).
- B box—Enter the “B” measurement to the nearest 1/10th millimeter, if required. (If the field is not visible, your lab does not require the information for the selected “Job Type”).
- Dbl—Enter the “Dbl” (distance between lenses) measurement to the nearest 1/10th millimeter, if required. (If the field is not visible, your lab does not require the information for the selected “Job Type”).
- Ed—Enter the “Ed” (effective diameter) measurement to the nearest 1/10th millimeter, if required. (If the field is not visible, your lab does not require the information for the selected “Job Type”.) If you do not enter an “Ed” measurement, and you have selected a “Frame Shape”, the “Ed” measurement will automatically be calculated.
- Select Standard Shape—Click the shape that most closely resembles the frame being used for the job. (If the fields are not visible, the information is not required).
- Frame Type—Select a frame type. (This information is required for some Job Types, and it is used by the laboratory lens processing system as part of the lens thickness calculations).
- Thickness Type—Select the lens thickness. The “Edge Thickness”, “Center Thickness”, and “Thickness at Drilling Point” options all give you the ability to specify particular lens thickness requirements. If you choose the “Lab Decides Best Thickness” option, you will not be required to enter the exact lens thickness information.
- RE Thickness and LE Thickness—Enter the “RE Thickness” and “LE Thickness” to the nearest 1/10th millimeter, if applicable.
QuickTip: For single vision lenses, the “Height” field will be populated with 1/2 the “B” measurement after the “B” measurement is entered. If you wish to change the “Height”, you can adjust it at this time.
QuickTip: If “Ed” is required, and you would rather choose a shape and not enter an “Ed”, try selecting a different “Job Type”. Your “Job Type” selection will determine whether or not you must enter the “Ed”.
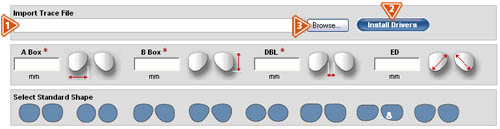
Option 2—Import Trace File
- Import Trace File—After you have selected the lens type, design, material, and treatments for the job, you can select to import a trace file and search your computer for the applicable file. Note: This feature is available based on the Job Type and supplier.
- Install Drivers—The tracer driver must be installed prior to attaching a trace file to a job, click here to install a trace driver.
- Browse—Click the “Browse” button to search for the trace file. This will open the “Choose File” screen, which allows you to search your computer for the applicable file, or enter the directory path and the name of the trace file that you want and clcik the “Browse” button.
- Select the file you wish to upload, and click the “Open” button.
- You will now see the main ordering screen with the exact frame shape, measurements, and frame type that was imported.
- Delete Imported Trace File—If you wish to delete the imported trace file, click the “Remove” button, and follow the previous steps to select another trace file to upload.
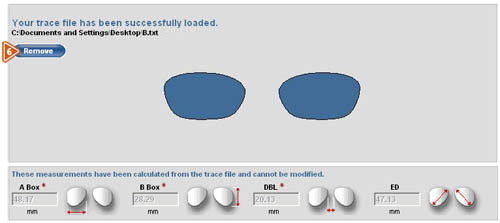
QuickTip: Clicking the “Remove” button will not delete the trace file from your computer’s hard drive.